
Introduction
You pull out a pie pan labelled “9-inch,” measure it against the recipe, and something’s off — the crust doesn’t quite reach the rim, or the filling comes dangerously close to spilling over. You’re not doing anything wrong. Most pie pans simply aren’t measured the way the box makes it sound.
That gap is exactly why knowing how to measure a pie pan matters more than trusting the label. I’ve measured plenty of “9-inch” pans in my own kitchen, and the number on the packaging rarely tells the full story — the inside is what actually decides how your pie turns out, not the outside edge. Below is exactly where to put the ruler, and what each measurement — diameter, depth, and capacity — actually tells you before you start rolling out dough.
Measure a pie pan from the inside, not the outside — that’s the one number that decides whether your crust and filling actually fit the way the recipe intends.
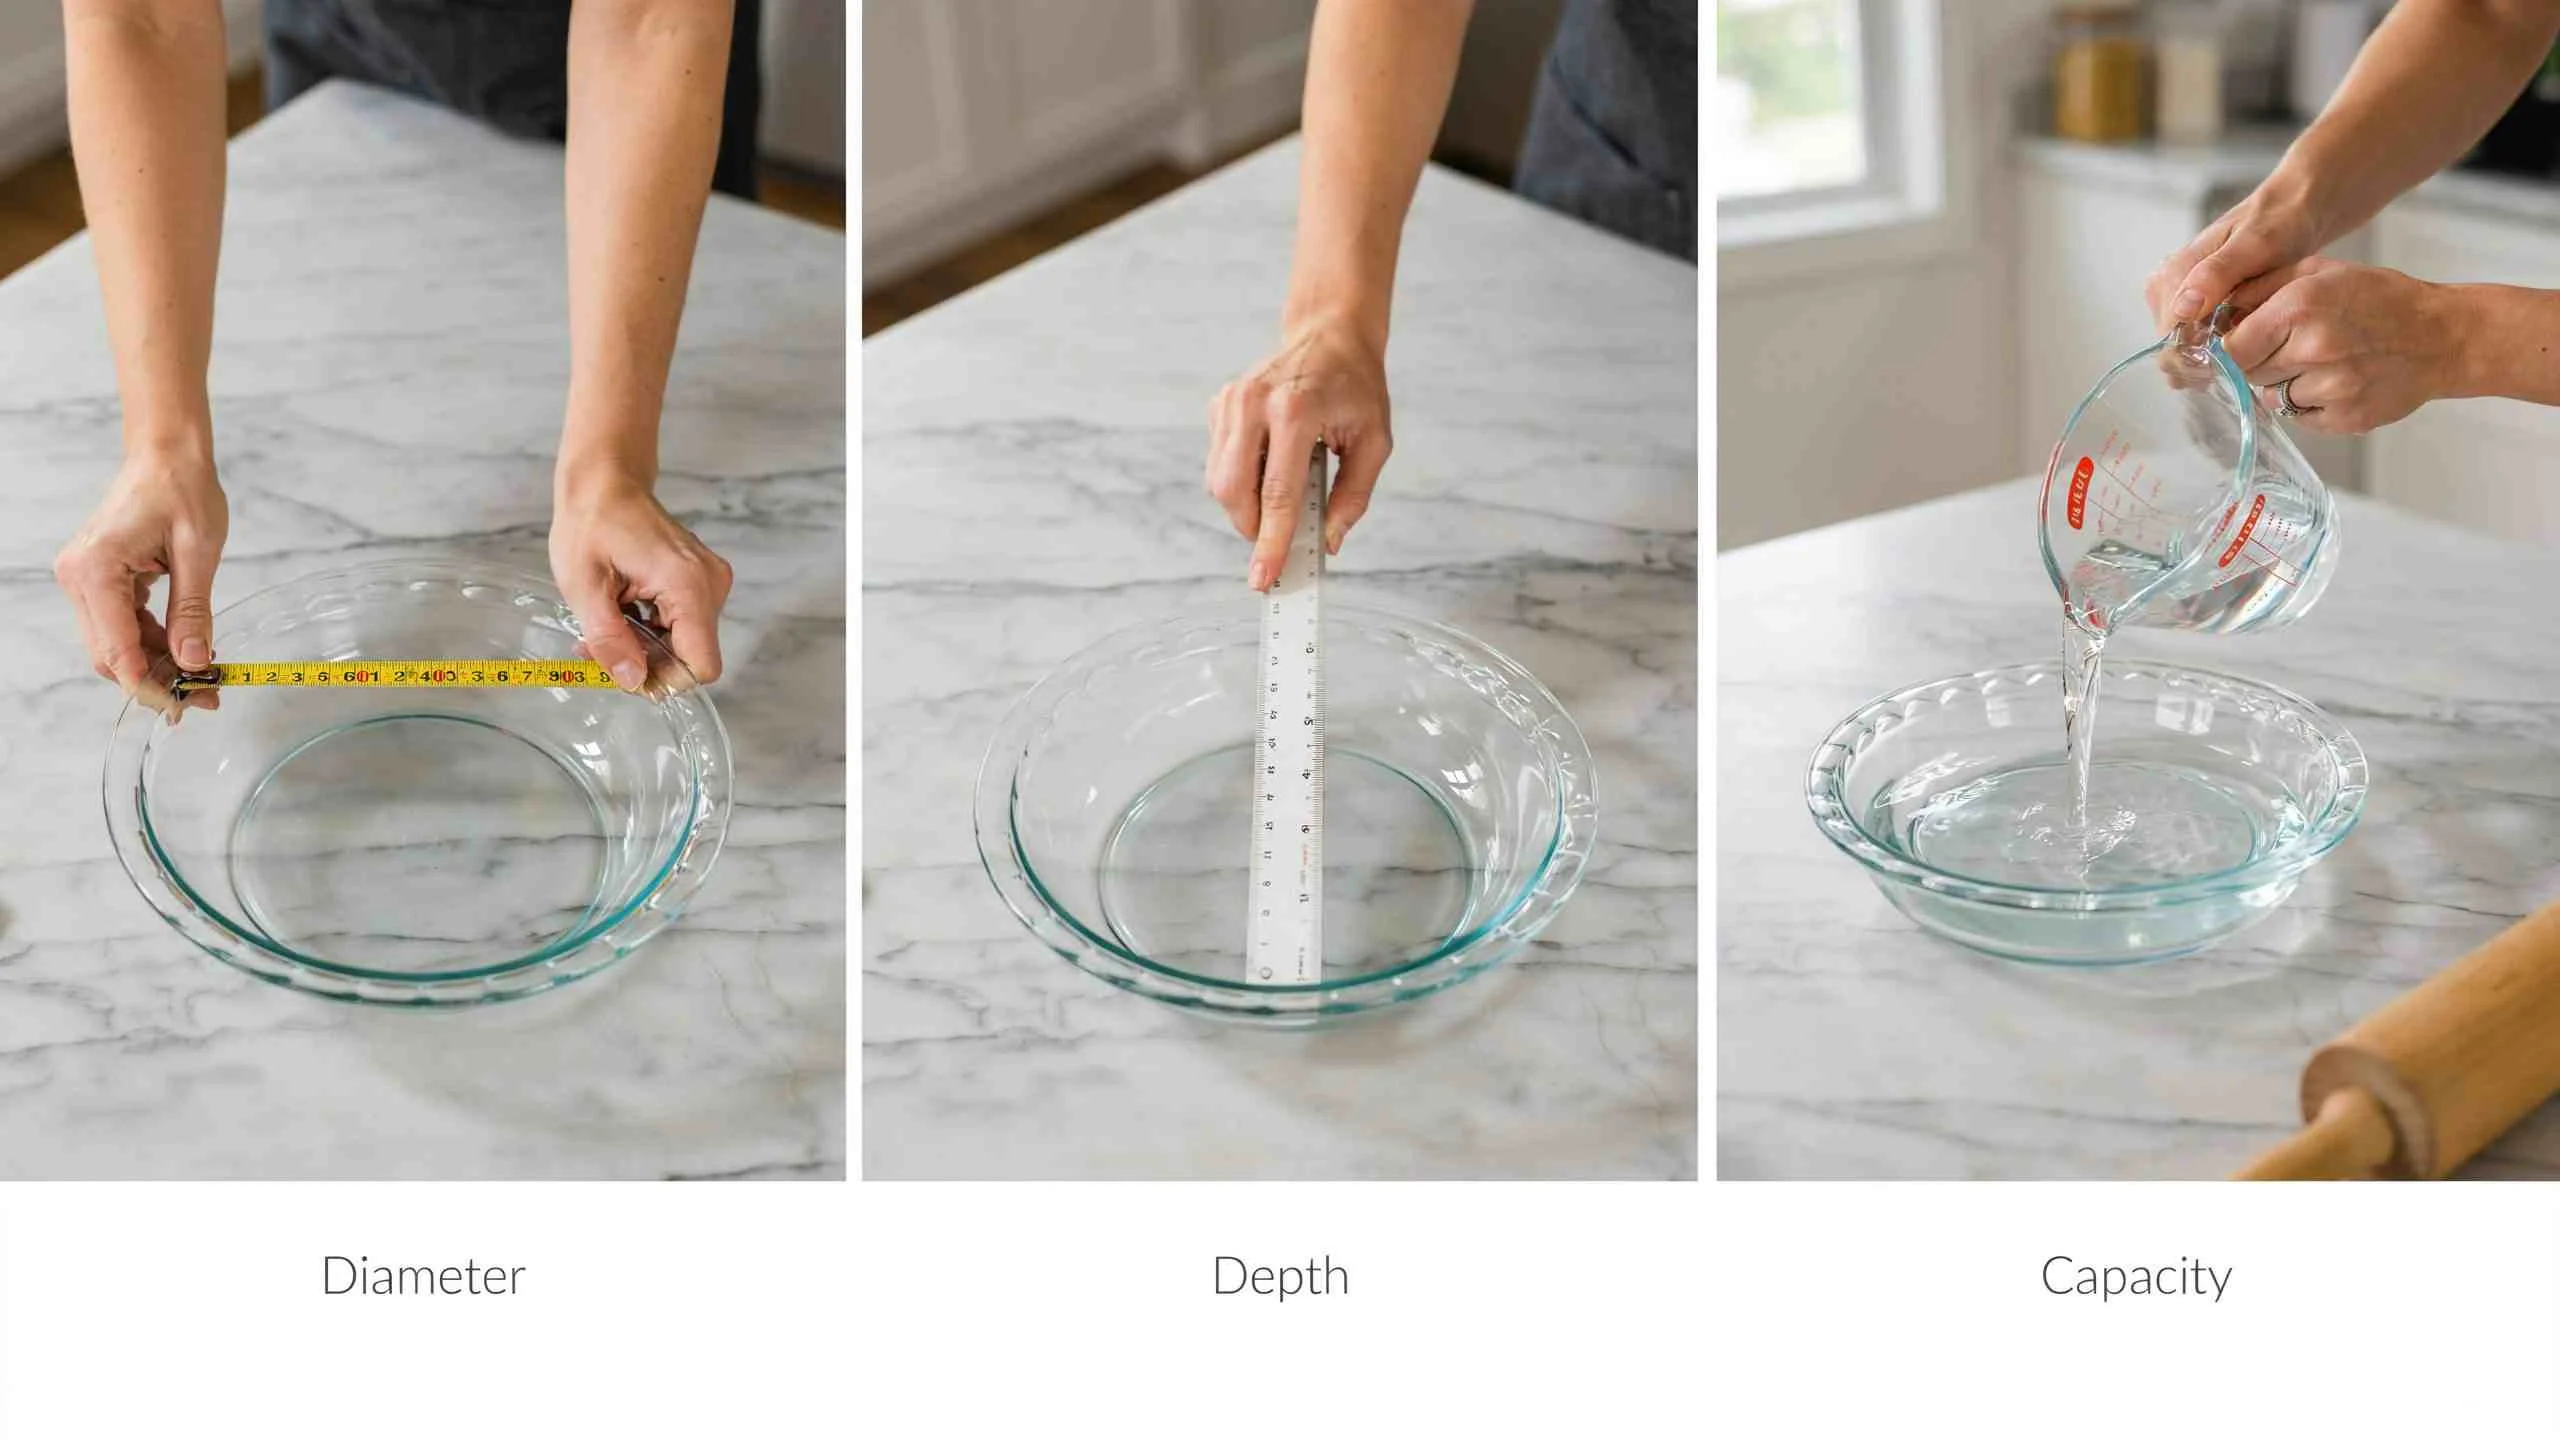
Three measurements matter, and each tells you something different:
- Diameter — the width across the top opening, inner rim to inner rim. This is what a recipe means when it says “9-inch.”
- Depth — the vertical height of the pan’s inside wall, measured straight up rather than following its slope.
- Capacity — how much the pan holds, measured in cups of water. This is the number that catches what a fluted or tapered pan hides from the other two.
You’ll need a tape measure or ruler for the first two, and a liquid measuring cup with water for the third — grab both now, since the steps below run back to back.
How to Measure Diameter — And Why “Inside” Is the Only Number That Counts
Lay your tape measure or ruler flat across the top of the pan, from the inner edge of the rim to the inner edge directly across from it — the widest point of the actual baking surface, right where the crust sits. That number is your pie pan’s diameter. Not the outside edge of the rim. Not whatever’s printed on the box.
Where to actually put the ruler
Set the pan right-side up on your counter. Rest the ruler or tape flat across the top opening, and let it touch the inside wall on both sides — not the outer lip that curls over the edge. Where the ruler crosses the inside edges on both sides is your reading. If you’re using a soft tape measure, keep it pulled taut and flat; it’s easy to let it dip slightly into the pan and read a number that’s a hair too big.
The number on the box isn’t the number you just measured
Here’s the mismatch nobody points out: most manufacturers print the outer-edge-to-outer-edge measurement on the packaging, because that’s the easier number to standardize across a product line. But that’s a shelf number, not a baking number. I’ve grabbed a tape measure and checked this on more than one “9-inch” pan sitting in my own cabinet, and the pattern holds every time — the inside comes up smaller than the label suggests, sometimes by close to half an inch. That gap is exactly why a recipe can feel like it doesn’t fit “the right size” pan.
Why the inside number is the one that actually matters
Your crust doesn’t drape around the outer lip of the pan — it drapes around the inside wall. The inner diameter is what determines how much dough you need to line the pan without it being stretched thin or bunching up at the edges, and it’s what determines how much filling the pan can hold before it’s pushing up against the rim. Recipes are written around that inside number, whether the writer says so or not.
One more place people get this wrong: measuring off to one side
Run your ruler across the true center of the pan, not diagonally and not a couple inches off to one side. A pass that misses the center will read smaller than the pan actually is, since you’re no longer measuring the widest point. If you’re not sure you’ve hit the center, take the reading two or three times at slightly different angles — the largest consistent number you land on is the real one.
Measuring a Fluted or Scalloped Rim
A fluted or scalloped pie pan won’t give you one honest diameter reading no matter where you put the ruler, because the rim itself is uneven — measure across a raised peak and you’ll get a different number than measuring across the low valley right next to it. On a pan with a pronounced flute, that difference is big enough to actually matter.
Why a wavy rim throws the whole reading off
A plain round pan has one consistent edge, so any pass across the middle gives you the same number. A fluted rim ripples in and out around the whole circumference, which means the “edge” you’re measuring to keeps changing depending on exactly where your ruler lands. Line it up with a peak and the pan looks bigger than it is. Line it up with a valley and it looks smaller. Neither one is wrong, exactly — they’re just measuring different points on a rim that was never meant to be perfectly round in the first place.
Where to actually take the reading
Measure at the low point of the flute — the true interior edge, where the crust actually sits once it’s pressed into the pan. That’s the number that matches what the pan can physically hold, regardless of how decorative the rim looks from the outside. If you’re not confident you’ve landed on a low point, take two or three readings across different spots around the rim and go with the smallest consistent number you get. The smallest reading is almost always the accurate one; the bigger numbers usually mean you caught a peak by accident.
Why this is where most home measurements quietly go wrong
I’ve measured plenty of scalloped pans in my own kitchen, and this is the exact spot where a careful measurement can still come out wrong without you realizing it. You do everything right — inside edge, straight across, good ruler — and still land on a number that’s off, simply because of where the ruler happened to cross the flute. And when that happens, most people don’t blame the ruler. They blame the recipe, or assume their pan is mislabeled, when really the rim itself was never going to hand them one clean number to begin with.
How to Measure Depth Without Overstating It
Hold your ruler straight up and down inside the pan, from the bottom of the interior to the top of the rim — vertical, not resting along the slanted wall. That’s the pie pan’s actual depth, and it’s usually shallower than it looks once you measure it the right way.
Why the “flush against the wall” method gives you the wrong number
A lot of pie pans have sloped sides, angled outward from the base to the rim. If you rest your ruler flush against that slope, you’re not measuring depth at all — you’re measuring the length of the slope itself, which is always longer than the vertical distance from the bottom to the top. That’s the exact mistake behind some of the depth advice floating around online: it tells you to run the ruler along the wall, which quietly inflates the number every time.
Where to actually hold the ruler
Stand the ruler straight up from the inside floor of the pan, keeping it plumb — perpendicular to the base, not angled to match the wall. Read the measurement where the top of the rim crosses the ruler. On a pan with steep sides, this can come out noticeably shorter than what you’d get by following the slope, and it’s the number that actually reflects how much filling the pan can hold before it reaches the top.
One quirk worth knowing, in one line
If you’re used to measuring a tart pan instead, this whole problem doesn’t apply — tart pans have straight vertical sides, so there’s no slope to measure around in the first place. That’s a shape difference more than a technique one, and we get into it properly in our pie pan guide.
I’ve measured enough sloped pie pans in my own kitchen to know this is the step people rush past — it feels like it should be as simple as diameter, and it’s the one where the ruler’s angle quietly decides whether your number is honest or not.
How to Measure Capacity — The Water-Fill Method
Fill the empty pan with water, one measured cup at a time, until it reaches the rim, and count the total as you go. Whatever number you land on is exactly how much filling that pan can hold — no guessing, no chart to look up, just the real capacity of the pan sitting in front of you.
How to actually run the water test
Set the empty pan on a flat surface and start pouring in water using a liquid measuring cup, one cup at a time, keeping a running count as you go. Stop the moment the water reaches the rim — not before it, and not overflowing past it. That count is your pan’s true capacity, in cups. It only takes a couple of minutes, and it’s worth doing once and writing the number down somewhere you’ll actually see it again, like taped inside a cabinet door.
Why this step earns its place even after you’ve already measured diameter and depth
Diameter tells you how wide the pan is. Depth tells you how tall it is. Neither one tells you how much space is actually inside, because a sloped or fluted pan tapers as it goes down — the bottom of the pan is smaller than the top, so a chunk of that “width times height” space isn’t really there to hold filling. Two pans can match each other almost exactly on diameter and depth and still hold noticeably different amounts, purely because one tapers more sharply than the other. Capacity is the number that catches that difference, because it’s not calculated — it’s just what actually fit inside when you filled it.
Why I trust this number over anything printed on a box
I’ve run this same water test across pans in my own kitchen that were labeled the same size, and the capacity didn’t always match. That’s the part diameter and depth alone can’t tell you, and it’s exactly why this step is worth the two minutes it takes — it’s the one measurement that’s impossible to get wrong, because you’re not measuring the pan, you’re measuring what it actually holds.
No Tape Measure? A Fast Workaround
You don’t need a tape measure to get a usable diameter reading — a piece of string or kitchen twine laid across the inside rim works just as well, and a standard sheet of printer paper can give you a fast gut-check if you just need a rough number in a hurry.
The string method, for an actual measurement
Lay a piece of string or kitchen twine flat across the inside of the pan, from one inner rim edge to the other, right at the true center. Pinch the string where it meets each edge, then lift it out and lay it flat against a ruler or yardstick to read the length. It won’t feel as precise as a tape measure, but it bends around the inside of the pan the same way a soft tape would, and it gets you the same number.
The printer paper trick, for a quick estimate
A standard sheet of printer paper is 8.5 inches wide. Lay it across the top of the pan, and you’ve got an instant reference point — if the pan’s opening reaches close to both edges of the paper, you’re looking at roughly an 8.5-inch pan; noticeably wider or narrower tells you which direction to adjust from there. It’s not a substitute for an actual measurement when precision matters, but it’s the fastest way to get a rough sense of what you’re working with when you don’t have a ruler within reach.
I keep both of these in my back pocket for exactly the moment when I need a number and the tape measure is nowhere to be found — between the two, you can always get close enough to know if a pan is going to work for what you’re baking.
Your Pan Doesn’t Match the Recipe — What the Numbers Actually Tell You to Do
Now that you know your pan’s real diameter, depth, and capacity, here’s what to actually do with those numbers: a smaller-than-called-for pan needs less filling to avoid a mess in your oven, and a larger one bakes faster and comes out shallower than the recipe photos show. Which direction you’re off in tells you exactly what to adjust.
If your pan measures smaller than the recipe calls for
A smaller pan means less room for the same amount of filling, so pour it in gradually and watch the fill line instead of dumping in the full amount and hoping it fits. Filling right up to the rim on an undersized pan is exactly how you end up with a scorched oven floor and a pie that boils over the edges halfway through baking. Hold back the last bit of filling rather than forcing all of it in — you can always bake the extra separately in a small ramekin.
If your pan measures larger than the recipe calls for
A bigger pan spreads the same amount of filling across more surface area, so the pie comes out shallower than the recipe intends, and it bakes faster because there’s less depth for the heat to work through. Start checking for doneness earlier than the recipe says, and don’t expect the tall, generously filled look from the photos — a wider pan trades height for spread every time.
When adjusting isn’t worth it
Small gaps are easy to work around. But if your numbers are off by a lot, no amount of holding back filling or watching the clock closer is going to make the pie turn out the way the recipe intended. At that point, the simpler move is just buying a pan that’s actually the right size instead of fighting your current one every time you bake — that’s exactly what we walk through in our pie pan buying guide.
I’ve adjusted around a mismatched pan plenty of times in my own kitchen, and it works — right up until the gap gets big enough that adjusting stops being worth the trouble.
Faqs
Do you measure a pie pan from the inside or the outside?
From the inside. Diameter should always be measured inner rim to inner rim, straight across the widest point. That’s the number a recipe is written around, since it reflects how much dough and filling the pan can actually hold — not the outer edge, which is usually a couple ticks larger and doesn’t affect how the pie bakes.
Why do two pans both labeled “9-inch” look different?
Because “9-inch” isn’t standardised. Some brands measure outer edge to outer edge, others measure the inner rim, and some round up from an odd number like 8.75 inches. A fluted or scalloped rim adds another layer of inconsistency, since the reading can shift depending on whether you measure across a peak or a valley.
Does the pan’s material (glass, ceramic, metal) change how you measure it?
No — the method stays the same across glass, ceramic, and metal. What does change is how forgiving the pan is to measure: glass and ceramic pans often have a thicker rim, which makes the gap between the outer and inner diameter more noticeable, so it matters even more to measure the inside rather than assume.
Can you measure a pie pan before buying it online, from just the listing photo and specs?
Not precisely, but you can get close. Look for a spec sheet that separates “interior diameter” from overall width, and check the depth listed. If the listing only gives one number with no clarification, treat it as an outer-edge measurement and expect the real interior size to run slightly smaller.
Conclusion
If you only take away one thing from all of this: measure the inside, not the outside. Every mismatch, every overflowing pie, every crust that comes up short — it almost always traces back to trusting the number on the box instead of putting a ruler where the filling actually sits.
Grab a tape measure, check your pan’s real diameter, depth, and capacity, and you’ll know exactly what you’re working with before the next recipe asks you to guess.

Hi, I’m Muhammad Din. I test and compare kitchen tools in my own kitchen before I ever recommend them — if it’s in a guide on HomePlora, I’ve used it or dug deep enough to know exactly where it holds up and where it doesn’t. My goal is simple: help you find tools that actually earn a spot in your kitchen, without wasting money on ones that don’t.